I basically just read over this tutorial once and decided it didn't sound too hard! So here is what I did.
First, let me tell you that my box spring is a queen sized split box spring. My husband and I were debating getting a new one that's just one piece because we were tired of it sagging in the middle, but we didn't want to pay for it (we're cheap like that). So, I cut pieces of wood and framed it together myself.
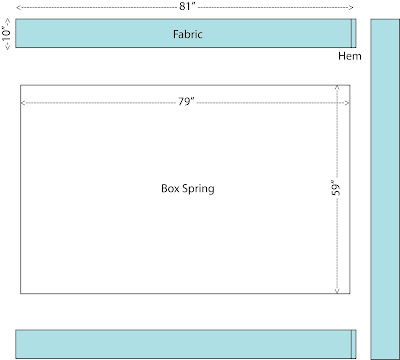
After I framed it, I measured my box spring and bought my fabric. I used 3 strips of fabric (I didn't upholster the side that is against the wall) that were 10" wide and 81" long. Technically the short side didn't need to be that long, but I was lazy and just cut them all to the same length. My box spring measured 59 x 79 inches and was 8 inches deep with the new wooden frame. (Sorry I don't have a real picture of this. I got ahead of myself!) Here is a drawing of what it looked like.
Then I just upholstered it using a staple gun like you would do any other reupholstering project. I started with the short end and stapled it all on the bottom. I wrapped it so it went around the corner about 3 inches. Then I did the other 2 sides.
My handy husband drilled holes in the wood frame and we screwed in our new furniture legs that I bought from Home Depot. I spray painted the 4 corner ones white, but left the one in the middle unfinished since we can't see it. Then we unscrewed the legs so we could flip the box spring over.
After stapling it all to the bottom, we flipped it over and stapled the top. Then I trimmed the excess fabric. (If you don't have a comforter or bedspread that will cover to the top of the box spring, be careful how much fabric you trim!)
Re-screw the legs on, and voila! You have a beautiful new, upholstered box spring for only a few dollars!
P.S. Our room is looking awesome! The walls are painted, the floor is done and most of our furniture is moved back in. Can't wait to show you!
Also linking to:
http://www.myrepurposedlife.com
http://www.remodelaholic.com
http://shabbynest.blogspot.com/
http://www.thejennyevolution.com/
http://linda-coastalcharm.blogspot.com/
http://www.savvysouthernstyle.net/


This is fantastic! I've thought about doing this a few times because I am yet to purchase a proper frame for our bed. You make it look so easy and stylish. Pinned this to my DIY board! :)
ReplyDeleteThanks Jazmin!
DeleteHello, here’s how to find the one that suits you best. Getting a good night's sleep depends on a lot of different factors -- comfort, stress level, room temperature. Something new, that split queen box spring mattress is actually divided into two half mattresses with a hinge in between that allow them to fold over. It is able to be lifted, the two pieces give it flexibility and the split queen box spring mattress can easily be moved. Get more info, click here or visit:
Deletehttp://kidbuxblog.com/recommended-ways-to-buy-split-queen-box-springs/
That's a really creative way to cover up an ugly box spring, rather than using a bed skirt. I'm definitely going to pin this.
ReplyDeleteI've been meaning to do this myself! Great job. I'd love for you to link up to The DIY'ers. http://homecomingmn.blogspot.com/2013/08/the-diyers-and-last-weeks-top-three.html
ReplyDeleteThanks Kayla! I linked up!
Deleteum, never would have thought to do that! what an easy transformation!
ReplyDeleteCarissa, it was REALLY easy!
DeleteIla@lilsprinklesofjoy
ReplyDeleteI love this idea! So much better than any bedskirt and great for beds that bedskirts don't work!
Thanks Ila! We love the way it turned out.
DeleteFantastic project and thanks for the tutorial too. Thanks tons for linking to Inspire Me. Hugs, marty
ReplyDeleteThanks Marty! I enjoy your Inspire Me party!
DeleteI love what you have done. You should come party with us and show of your creativity.
ReplyDeletehttp://obsessiveandcreative.blogspot.com/2013/08/craft-frenzy-friday-2.html
Have a great weekend!
Thanks Rhonda. I linked up!
DeleteI hopped over from Craft Frenzy Friday.
ReplyDeleteI've been wanting to do this.
I like how yours turned out.
You make it look easy!
Thanks! It really was easy. As long as you have access to a staple gun ;)
DeleteLove this idea, looks great. Pinning it now, I have a bed that needs this.
ReplyDeleteNew follower.
Wanda Ann @ Memories by the Mile
http://www.memoriesbythemile.com/
Thanks Wanda! I love getting new followers!
DeleteI never even thought of it! Great idea!!
ReplyDeleteWhat a great idea! I love those legs, and I am not a fun of bed ruffles my kids always destroy them! I need to try this! Thank you for linking up at my Furniture and Paint Party!
ReplyDeleteBrooke
startathome..blogspot.com
This looks great! I have to do this with my box springs!! I'm co-hosting Tell Me Tuesday this week and you should come link up with us at www.craftdictator.com!!
ReplyDeleteThanks for posting on Craft Frenzy Friday!
ReplyDeleteLove this idea Katie..... I'm a new follower and can't what's next! Loved your master bedroom reveal, as well!
ReplyDeleteSuzie @ Dorothy Sue and Millie Bs too
Brilliant transformation.
ReplyDeleteWhat a wonderful layout.Fire Engine Kids Bed
First, let me tell you that my box spring is a queen sized split box spring. ... qbspring.blogspot.com
ReplyDeleteI did this an easier way. I bought a fitted sheet, placed it on the box spring and then secured it all around with staples. With the help of my husband moving the mattress and turning over the box spring it took me less than a half hour to do this.
ReplyDelete