11.28.2012

Snowman Hot Chocolate

Here's another MOPs craft for you ladies! I'm calling this one Snowman Hot Chocolate. It makes a really cute gift (we made it to give to our neighbors) or just use it as a decoration. My goal for the MOPs crafts is to do something that doesn't take a lot of time or effort, that way the ladies can focus on chatting with each other while they do it, so this doesn't require much of either of those!

I found the idea from Pinterest (where else?) and put my own spin on it.

Step 1: Gather your supplies
3 jars with lids
Red felt strip (or you could use fabrics instead of felt)
Black felt strip
Peppermints
Hot chocolate
Mini marshmallows
Hot glue gun


Step 2: Hot glue the black felt around one of the lids to make the hat. (I glued a long line onto the felt and sort of rolled the lid onto it)


Step 3: Fill your jars with peppermints, marshmallows, and hot cocoa. 


 Step 4: Hot glue the red felt into a scarf shape and drape around the hot cocoa jar.


 Step 5: Paint eyes and a nose (and a mouth if you want!) on the marshmallow jar. (I used puff paint.)


Step 5: Stack your jars on top of each other and you have adorable Snowman Hot Chocolate.


**Update: I've had a few people ask where we got the jars to make this. We bought them at Specialty Bottle.
Photobucket
Pin It!

Blog Feature Friday: Sweet Pea Pod


Hi there, I’m Danielle from Sweet Pea Pod. I was super excited when Katie asked me to do a guest blog post for The Copper Coconut! Today I will be sharing an easy DIY window frame art hanger. Let me tell you we use our art hanger religiously in our home. It keeps all the artwork up on display where it should be.

I have three beautiful children! They are now all of age to use crayons and paint and let me tell you they use the HECK out of it. Naturally, as a mom I love to display their wonderful artwork. Covered fridges, doors and walls just aren’t my thing, I was filing* so much of their works or art.  Filing= kindly placing in the recycling bin when children are not looking.  This was making me feel bad. I mean they really do work quite hard on some of this stuff.

So…
A few months ago I came across a classifieds ad for window frames for super cheap… $4.00 each. They weren’t the thick fancy ones, but I couldn’t pass up that price. After I bought these guys I hung them up in the garage and there they sat.  And then they sat some more and then some more again. My husband bugged and asked and pestered me about what I was doing with them.  Thinking about my children’s endless artwork I thought up a solution to both problems.

The frames were a cream/white color so I did a light sand to a few areas and a rough sanding to a few areas. Then I applied some blue stain I had laying around.  I couldn’t be happier with how the color turned out.

I love jute! I love using jute on my projects. This one was no different. I tied some jute across the frame in 3 places.

Topped it all off with my kids artwork. It’s a great way to showcase kids art and it also works great as a dryer for painted/glued projects.  Start to finish not including drying time for the stain (this took about 2 hours) was like 40 minutes.
I think it turned out great. Now there’s no more covered house with kids’ crazy art.

AL


**Super cute! What do you all think? 
Photobucket
Pin It!

11.26.2012

Christmas Decorating

While I'm not a huge fan of cold, snow, and dreary weather, I have to say that decorating for Christmas definitely brings cheer to this lady! Something about the white lights, fires in the fireplace, pinecones, and jingle bells makes the weather bearable. Not to mention drinking hot cocoa (with mounds of marshmallows, of course) from a cute snowflake mug!

Here are some of our decorations. We had to do things a little simpler this year, thanks to having a toddler, but I kind of like it.


Photobucket
Pin It!

Mason Jar Christmas Gift

I'm back! I hope you've been enjoying the Blog Feature Friday posts. I know I sure have been! All of the posters have had such great ideas. (If you would like to be featured, please let me know!)

This week I am giving some gifts to ladies who help out at our MOPs by watching our kids. I wanted to give them all something that would be a cute Christmasy type thing, but also be useful in the future (and not cost a fortune). Here's what I came up with.


 I love, love, love the candy cane peppermint sticks from the Cracker Barrel store and they fit perfectly inside my little mason jars that I had on hand. I had some green paint chips left over from a project we did and cut them into little Christmas tree shapes for the tag. I got the idea from Pinterest. Simply punch a hole and tie with twine around the jar.


I also got the idea to use cupcake liners as a mason jar lid from Pinterest.


I think they turned out really well! What do you think?
Photobucket
Pin It!

11.21.2012

Green Diamonds Stained Glass-- For Sale!

I think I've told you all before how much I enjoyed doing stained glass in college. Well, I've started it up again!

For Sale $85
Green Diamond Stained Glass


Specs:
14.25" x 9.75" (not including hangers)
Lead came panel with zinc frame
Several different styles of glass including green and blue swirl, clear, and green.

Shipping available at additional cost.

If you would like to purchase this piece, you can go to my contact page and email me or leave a comment below.

Photobucket
Pin It!

11.16.2012

Blog Feature Friday: Creative Home Expressions

Hi, I’m Kathy from Creative Home Expressions! Katie was kind enough to invite me over here to The Copper Coconut to share one of my makeovers with you. Today I’m sharing a recent tote makeover. I found this one at our local antique mart for $8.00. Kind of plain but I liked the shape and size.


I started out by painting it with my Annie Sloan chalk paint in Old White.


I then added a graphic to each side; this one from Debbie at Confessions of a Plate Addict.


I used the Mod Podge method to transfer the graphic to the tote. Using a toner printed/copied graphic {I copy mine at the library}, I cut my image as close as possible. The image must be printed in reverse/mirror image.


Apply Mod Podge to the image side and apply to your piece. Gently smooth it out and then, walk away. I generally leave mine to dry overnight.


The next morning, I wet a paper towel and wipe it over the paper. Just to get it wet enough so that I can rub my finger over it. It will come up like this.


Using light pressure, rub your finger over the paper until it starts to come up. This is what it looked like after my first go over.


Once it is done, you can wax it or apply a coat of polyurethane for protection. I applied a coat of clear wax to the entire piece once I was done.


A new look for a plain old wood tote!


Thank you, Katie, for having me over to visit!

Wow. Isn't that tote amazing?! I love it! And she has so much more awesome stuff on her blog.
Photobucket
Pin It!

11.14.2012

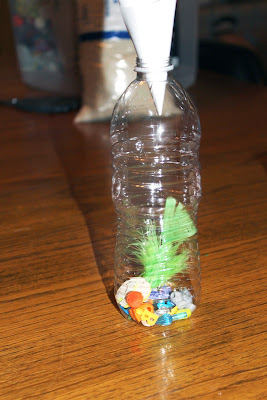
iSpy Bottle

I feel like I'm always looking for new ways to entertain my toddler. Most moms I know say they end up "rotating" their kids' toys so they don't get bored with them. I saw a this on Pinterest and thought it was a great idea to keep kids busy!

We ended up doing this as one of our MOPs crafts. (See the other crafts we've already done here and here.) It was really cheap and really easy.
What you need:
Bottle (we recycled water bottles)
Misc. items (to make it really inexpensive, find things you already have laying around the house!)
Rice
Hot glue gun
Funnel
Index card (optional)

Step 1: Gather your supplies.
 Step 2: (Optional) Write out your items so your kids can look for specific things.
 Step 3: Fill your bottle with items.
 Step 4: Pour your rice into your bottle (I used a funnel and it was a lot less messy!)
Step 5: Shake until the items are mixed in and hot glue your lid on (to prevent spills).

And there you have cheap entertainment!
Photobucket
Pin It!

11.09.2012

Blog Feature Friday: Red Hen Home

This week's guest blogger is Korrie. She has an absolutely adorable blog! Check out this repurposed card catalog she shared with us today.

Hi!  I’m Korrie from Red Hen Home, where I blog about furniture refinishing and other home projects.  I’m delighted to be guest-posting here at the Copper Coconut!
Today I thought I’d share a project I finished for MYSELF this fall.  Far too often I get involved in projects that don’t ever stay in my home…but this was an exception!
Last summer (I didn’t say I did it quickly), I came across a card catalog in the local classified ads.

I couldn’t send my sister after it fast enough (I’m good that way).
I love it, but I wasn’t crazy about the bland medium-oak finish.
This spring I discovered a MIRACLE product:  General Finishes Gel Stain.  With it, you can darken an existing wood stain without completely removing the original finish—you just have to scuff it up a little.  (See this post for a more complete description of how to use it.)
I chose to use the stain in Antique Walnut for this project, and this is what I ended up with!

I used three coats of stain, wiped on with a sock, and let each coat dry for about 24 hours in between.

I love the new color, and the fact that there are some variations of light and dark shades.  Some might call that user error, but I prefer to think of it as character!
I love the pull-out trays on this piece!

The card catalog sits in our front-room-home-office, and I see it and smile every day now.

If you’re interested in seeing some of the other office projects, I’d love for you to come visit Red Hen Home!
*****************************
Thanks for inviting me to visit, Katie!

How cute is that? And her office is AMAZING. Go check out her blog for more cute things!
Photobucket


Pin It!