9.27.2013

Muffin Tin Mini Pies

For my small group this year, we are doing a "theme night" for food every week. This week's theme was Fall Food. I immediately thought something with apple, which progressed to apple pie, which progressed to cherry and apple pie, which progressed to mini pies (my brain is haywire right now, if you can't tell). 


So I did a quick Google search for the easiest way to make a mini pie and found this recipe. This was a winner in my book because I didn't have to make the pie crust! 

Here's what I did. (Sorry in advance for the HORRIBLE quality of pictures. My kitchen has awful lighting and I was in a big hurry to get them done before small group!) 

Buy some refrigerated Pillsbury pie crusts (I found these near the refrigerated biscuits). If you want to make a full muffin tin, buy 2 packages. I didn't realize I would need 2 until it was too late. 


Roll out the pie crust.


Use a circular bowl or cookie cutter (about 4" diameter) to cut the crust.


Press it into your sprayed muffin tin so a little bit sticks up over the edge.


Add whatever kind of pie filling you want. 


Mine took about 2 big spoonfuls each. And I have leftover filling waiting for me to make more.


Roll out your extra crust and use a pizza cutter to make the lattice top. Whisk an egg and baste it over the tops of the lattice. This helps give it the nice golden brown color after it's baked.

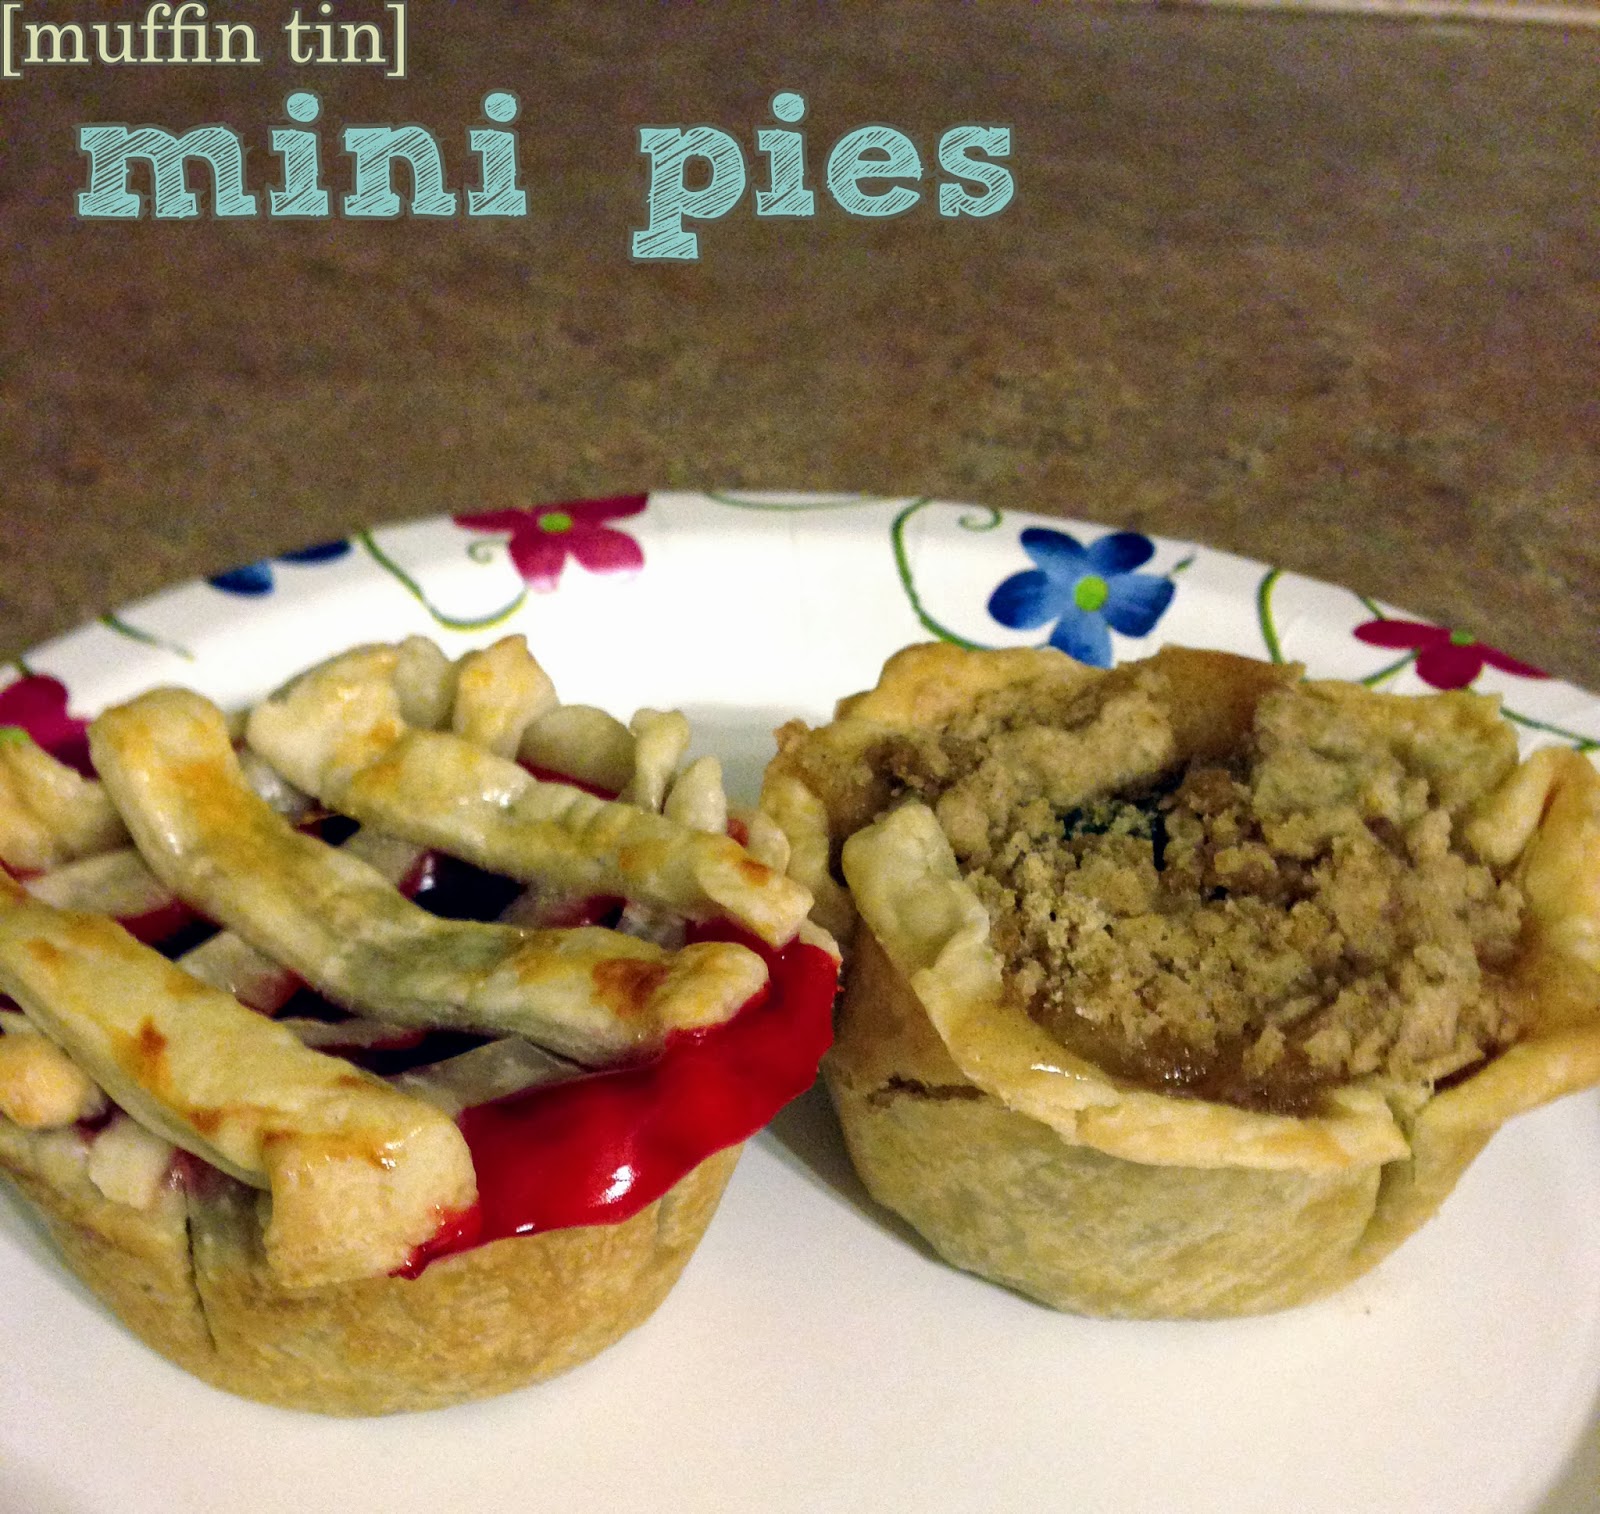
Since I didn't have enough crust, I made a crumble topping for the apple to turn it into a Dutch apple mini pie. Which was actually amazing.


Bake at 350° for 25-30 minutes, or until the crust is golden brown.


Let them cool in the pan for about 15 minutes then use a knife to remove them. Then quickly take a picture on a paper plate before it gets consumed.


INGREDIENTS: 
Pillsbury refrigerated pie crust
Pie filling
1 egg

DIRECTIONS:
Preheat oven to 350°. Spray a 12 cup muffin tin. Roll out the pie crust. Use a circular bowl or cookie cutter (about 4" diameter) to cut the crust. Press it into your sprayed muffin tin so a little bit sticks up over the edge. Fill almost to the top with your pie filling. Roll out your extra crust and use a pizza cutter to make the lattice top. Whisk an egg and baste it over the tops of the lattice. Or make a crumble topping. Bake at 350° for 25-30 minutes, or until the crust is golden brown. Let them cool in the pan for 15 minutes before using a knife to remove them. 

Photobucket

Don't forget to check out my Linky Party page to see where I'm linking up. And you can follow me on Pinterest and Twitter to get updates as soon as I post something new!
Pin It!

9.22.2013

Master Bedroom Reveal

Today's the day! My master bedroom is DONE and I finally get to show it to you all! I'm ridiculously excited. Obviously. And I'm thrilled with the way it turned out.

Be warned: there are a LOT of pictures in this post.

Here it is!


Remember what it looked like before? The first picture is what it looked like when we bought the house. And the second picture is what we had been living with for the last 4 years.


Bleh, right? I had literally hung about 3 things on the walls. A shelf with some pictures on it and 2 window frames as our headboard... which we hung too high and was very uncomfortable to lean against. That was the extent of decorating in this room. And it was SO dark with our dark green wall and our dark brown accents. We tore up the carpet about 2 years ago to reveal beautiful, unfinished hardwoods, which we had left unfinished until now.

Now, we have a beautiful light blue paint color (Benjamin Moore Arctic Blue) with white, teal and watermelon as our accent colors. Much lighter and brighter! We stained our floors dark (Minwax Dark Walnut) to offset it against the white trim. I also bought a new comforter and upholstered our box spring with fabric to match the paint (link for this tutorial at the bottom).


We added these two closets to our room. Before, there was only a tiny closet in the corner by where the door is. My husband was using that one and I was using one in the loft part of our upstairs (which is now our new nursery). Now we each have our own closet in our bedroom.


Building these closets on either side of the window also made a perfect little nook to put a chair and footstool. I totally transformed this chair, added a pillow that I sewed and made a ruffled shade to go on my thrift store lamp (check out the bottom of this post for the links to how I did all these projects, also).


For the windows, I was planning on making curtains because I had a specific idea in mind and couldn't find any that were in my budget. I wanted white curtains with nickel finish grommets that were 95" long(ish) so they would be ceiling height. I ran across some at Target while I was browsing their home decor section that were exactly what I wanted and they were on sale! So, needless to say, I bought those and saved myself the hassle of sewing curtains and adding grommets to them!


I repainted our window frames a glossy white and added fabric behind them to compliment the colors of the room and tie in with the pillows. I also painted our nightstands and the new lamps and added some accessories.  I pretty much found everything at thrift stores and garage sales, except the throw blanket. I bought that at Target.


I bought a couple of white Euro pillow shams from Amazon and made pillow covers out of different materials to put on the bed. I love the look of lots of pillows! It just makes the bed more inviting.


I'm seriously in love with the end product!


If you missed any of my previous master bedroom posts, and want to see how I did some of this stuff, you can catch up on them here:
More accessories before and after
Chair reupholstering tutorial
Ruffled lamp shade tutorial
Upholstered box spring tutorial
Work weekend
Accessories before and after
Thrift store accessories
The beginning and the inspiration board

Photobucket
P.S. There is one spot next to my closet that I am going to put this beauty. I just have to paint it and reupholster the stool. It's going to be my dressing/makeup table! But it was a complete afterthought and I ended up getting it for $15 when I bought my chair off Craigslist, so I don't feel bad about it not being done. (And it probably won't get done until after our new baby gets here!)


Linking to these parties:
http://suburbsmama.blogspot.com/2013/09/sunday-linky-26.html
http://www.funkyjunkinteriors.net/2013/09/upcycled-old-door-projects.html
http://www.flamingotoes.com/2013/09/think-pink-sunday-131/
http://diyshowoff.com/2013/09/22/that-diy-party-35/
http://www.itsoverflowing.com/2013/09/share-your-creativity-96/
http://www.sumossweetstuff.com/2013/09/block-party_22.html
http://www.craft-o-maniac.com/2013/09/craft-o-maniac-monday-with-huge-craft.html
http://homecomingmn.blogspot.com/2013/09/the-diyers-30.html
http://www.astrollthrulife.net/2013/09/183rd-inspire-me-tuesday.html#more
http://www.sugarbeecrafts.com/2013/09/take-look-tuesday_23.html
http://www.notjustahousewife.net/2013/09/show-me-what-ya-got-139.html
http://www.hopestudios.blogspot.com/2013/09/tutorial-tuesday_24.html
http://linda-coastalcharm.blogspot.com/2013/09/nifty-thrifty-tuesday-no180-and-shop.html
http://www.domestically-speaking.com/2013/09/196th-power-paint-party-popp.html
http://thetrendytreehouse.blogspot.com/2013/09/create-share-features-too.html
http://www.savvysouthernstyle.net/2013/09/wow-us-wednesdays-137.html
http://www.creationsbykara.com/2013/09/look-what-i-made-link-party-165-fleece-halloween-costumes.html/

http://somedaycrafts.blogspot.com/2013/09/whatever-goes-wednesday-189.html
http://diybydesign.blogspot.com/2013/09/fall-into-fall-its-party-136.html
http://www.the36thavenue.com/2013/09/best-diy-projects-25.html
http://www.theshabbycreekcottage.com/2013/09/transformation-thursday-223.html
http://shabbynest.blogspot.com/2013/09/frugal-friday_26.html
http://www.myrepurposedlife.com/2013/09/catch-as-catch-can-136.html
http://obsessiveandcreative.blogspot.com/2013/09/craft-frenzy-friday-6.html
http://www.astylishinterior.com/2013/09/stylish-friday-finds-4.html
http://www.craftionary.net/2013/09/friday-link-party-83.html
http://chiconashoestringdecorating.blogspot.com/2013/09/flaunt-it-friday-173.html
http://tatertotsandjello.com/2013/09/link-party-palooza-lowes-giveaway.html
http://www.bedifferentactnormal.com/2013/09/show-tell-saturday-092813.html
http://oneshetwoshe.com/2013/09/contributor-spotlight-great-idea-link-party-3.html
http://www.thejennyevolution.com/friday-flash-blog-no-37/
Pin It!

9.18.2013

More Master Bedroom Before and Afters

Our master bedroom is [this] close to being finished! I only have 2 things left on my list to do. I have to finish our headboard and paint my new dressing table and stool. I'm pretty sure only the headboard is going to get done before I have this next baby, though. (For those of you who don't know, I'm 37 weeks pregnant, as of yesterday.) I'm okay with that because the dressing table was an afterthought anyway. 

But I have managed to get a lot more of my furniture and accessories done! So, I wanted to show off some of them. 

My footstool for my reading corner (which you can see a preview of at the bottom of this post):


My cheap, matching lamps that I scored at a thrift store and my nightstands, which I bought at a garage sale a few years ago and have been wanting to paint ever since: 


I promise the full master bedroom reveal is coming SOON! Just gotta get that headboard finished and installed. And let's be honest... everything needs a good dusting with all the construction going on around here!
Photobucket

Also linking to:
http://www.savvysouthernstyle.net/
http://shabbynest.blogspot.com/2013/09/frugal-friday_19.html
http://missmustardseed.com/2013/09/furniture-feature-friday-favorites-link-party-11/
http://startathome.blogspot.com/2013/09/furniture-paint-party.html
Pin It!

9.17.2013

Easy Mini Pizzas

So I know a lot of my readers are getting back into the swing of school, sports practices and games, and homework starting during this new school year. While I don't have a child in school yet, I remember the crazy busyness! I thought you might be able to use a recipe that is quick and easy that you can whip up between all the activities going on.

Pillsbury has this amazing recipe for mini pizzas that we made last night and it only takes about 20 minutes total to make! We had a bunch of family over and we all had our own personal pizzas.


Ingredients:
1 can Pillsbury Grands! refrigerated biscuits
1 cup pizza sauce
2 cups shredded mozzarella cheese
1 package of pepperonis
*Any other ingredients you want on your pizza!

Directions:
Grease a cookie sheet (or 2 depending on how many pizzas you're making!) Place biscuits on sheets and press each biscuit until they're about 6-inches around. Top each pizza with whatever toppings you're wanting. Bake at 375* for 10-15 minutes, or until the crust is turning brown.


I love this recipe for families because what kid doesn't like creating their own pizza? They get to pick whatever toppings they want and do it themselves. I can't wait until my son is old enough to get involved in helping make dinner. He sure did love to eat it though!

You can find more recipes for Grands biscuits here. What are your favorite easy recipes?

Photobucket
I was selected for this opportunity as a member of Clever Girls Collective. The content and opinions expressed here are all my own and are not indicative of the opinions or positions of General Mills. Compensation was provided by General Mills via Clever Girls Collective.
Pin It!

9.14.2013

Clear Bevels

I told you in my last stained glass post that there was another custom piece I had done that I would be blogging about soon. Well, here it is!

This piece was made with the intent of matching another existing piece already in my client's house. They wanted all different kinds of clear glass and some bevels. The piece was made to fit into a window opening, instead of hanging on an already existing window. And it was HUGE! Almost 4 feet by 2 feet.


Here are some pictures before it was installed. 


 I looooove it!

Again, if you would like a custom piece made for you, please leave a comment or visit my Contact Me page and send me an email. I would love to work with you!

View other stained glass pieces I've done here:
Fleur de Lis (for sale $55)
Green Diamonds (for sale $75)
You Are My Sunshine (custom made)
Photobucket
Pin It!

9.12.2013

You Are My Sunshine

One of my friends recently had a baby and wanted a unique way of putting the words "You Are My Sunshine" in the room. She asked me if I could do a stained glass piece with those words, and I was so excited to be able to try!

I wanted to show you all how it looked completely finished and hanging in the window. I love the way it turned out!


And here are some pictures of the glass in progress. There are 110 tiny pieces of glass in this panel.


If you would like a custom piece made for you, please leave a comment or visit my Contact Me page and send me an email.

View other stained glass pieces I've done here:
Fleur de Lis (for sale $55)
Green Diamonds (for sale $75)

I've also done another custom piece that fits in a window frame that I haven't blogged about. That will be coming soon!

Photobucket
Pin It!