Showing posts with label Accessorize. Show all posts

8.13.2013

Master Bedroom Accessories: Before and After

I told you in my post about my thrift store finds that I would be doing some before and after posts about said finds. I've also been redoing some stuff we already had to go with our new master bedroom decor. I can't wait to see what it looks like after it's all put together! For now, here are some before and afters.


I actually tackled my first every pillow recover with a sewing machine for this pillow! And, it's the pillow sham style, so you can take the pillow out. I'm pretty darn proud of myself. (Also props to my mom who helped me figure out how to do it!)


Remember this gem? I LOOOOVEEEE the details on the mirror. The before color, not so much. Spray paint to the rescue! I used Valspar Tropical Oasis in a gloss finish (which is the only teal color I could find anywhere, and it's sold at Lowe's).


And here is my birdcage. It was a dark red and is now a nice shade of watermelon (That's what I'm calling the pink color, so my husband doesn't think I'm decorating our bedroom with pink.) I used Krylon Watermelon (see?!) spray paint in a gloss finish, which I picked up at Walmart.

Stay tuned for more before and afters! And for a progress report pretty soon about how our room is looking.

Photobucket
Pin It!

7.30.2013

Master Bedroom Thrift Store Finds

Hey! I'm so excited about our master bedroom project that I just have to give you another peak of what's happening.

We went to visit my sister and brother-in-law this weekend and while we were gone, my fabulous in-laws came over and did some major demolition in the room. There used to be a tiny closet in the corner of the room that enclosed the chimney. They took out the closet and they moved our bedroom door over to where it used to be. Next step is closing off the wall and fixing the floor. You can't really see it in this picture, but where the closet wall was, the wood floor is missing.

AND, last week I was able to go to some thrift stores because my wonderful parents watched my toddler and gave me a day to myself. I found a whole bunch of amazing things for SUPER cheap that I can't wait to decorate our room with! (P.S. If you're from around me and need a good thrift store to go to, Sell-It-Here in Lafayette is great.) So, here is a sneak peak of my finds. Eek! I'm so excited for this!

I will be doing some before and after posts once I get these things finished.
Photobucket
Pin It!

11.26.2012

Christmas Decorating

While I'm not a huge fan of cold, snow, and dreary weather, I have to say that decorating for Christmas definitely brings cheer to this lady! Something about the white lights, fires in the fireplace, pinecones, and jingle bells makes the weather bearable. Not to mention drinking hot cocoa (with mounds of marshmallows, of course) from a cute snowflake mug!

Here are some of our decorations. We had to do things a little simpler this year, thanks to having a toddler, but I kind of like it.


Photobucket
Pin It!

9.12.2012

11 Room Staging Tips

As an interior designer, I always have friends asking questions about their houses. There are a lot of things you can do to your house to make it look like you have had a professional come in and work on it. I've picked 11 staging tips to share with you today that are easy to do and don't cost a lot of money. 

De-clutter
This is a huge thing that doesn't cost a dime! Accessories are great, but only if you don't over-do it. If you have 14 different things on your fireplace mantle, put some of the items in a bin and rotate them every so often. There is no need to fill every side table in your living room with lamps, pictures, figurines, etc. so that a guest can't even set a drink down. Pick a few things that you love and get rid of the rest. It will make the room seem more open and inviting.
Source

Have a focal point
It's easy to make a focal point in a room. Choose what you think is the most important aspect of the room and make it stand out. A fireplace, if you have one, is a natural focal point in the living room. Paint the wall a contrasting color and hang a large picture over the mantle to create a focal point. The dining room table is usually the focal point of the dining room. Put a table cloth on it and create a centerpiece in the middle of it. If you have floor-to-ceiling windows in a room, arrange your furniture to face the beautiful view outside. 
Source

Furniture grouping
Rearranging furniture in a room is a great way to update with what you already have. Try to create seating areas that are cozy and comfortable. Place 2 sofas (or a sofa and a couple of chairs) facing each other with a table in between, or a sofa and love seat in an L shape. Use 2 accent chairs for extra seating next to the fireplace. There are a lot of different types of arrangements you can use. Just play around until you find something that you like. (Keep in mind the focal point of the room!) Also remember that furniture doesn't have to be placed on the walls. A sofa in the middle of a room with a sofa table behind it can be even better than shoving everything against a wall. 
Source

Different types of lighting
Using different types of lighting is a great way to make your space feel homey. There are 3 main types of lighting. Ambient lighting is general, overhead lighting, such as can lights or ceiling fan lights. Task lighting is lighting used for certain types of things, such as the light over your stove or kitchen island, a desk lamp for doing homework, etc. Accent lighting is used to enhance certain features, such as track lighting focused on a gallery of pictures or under-cabinet lighting in the kitchen. Use all three types of lights in one space and it makes for a beautiful room! 
Source

Neutral with accents
Using neutral colors in your home will appeal to many more people than using bright or dark colors, especially if you are trying to sell. Paint the walls a nice shade of beige and use neutral colored furniture to create a sort of "blank canvas" to work with. Create colorful accents with pillows, throw blankets, or even painting one wall a different color. Try to stick to 1 or 2 colors for your accents. Using different shades of 1 color is a great way to go!
Source
Odd numbers
One mistake people often make is using the wrong number of accents. Using odd numbers has been proven to be more pleasing to the eye (especially groupings of 3) than using even numbers. For example, in the picture below, the vase with the reeds is one element, the books with the bird is another, and the bowl of rocks is the third. On my mantle right now I have 3 candlesticks on one side, and a picture, bird cage and vase on the other. 
Source

Fresh is best
Using fresh flowers, plants, or even sticks from your own backyard is a great way to liven up any room. It brings the outside in and usually makes a colorful impact. Obviously, if you don't have flowers or plants you can pick from your garden, you can make a trip to the local florist. This is a fabulous and inexpensive way to change your room, depending on what flowers are in season. 
Source

Vary textures
Using various textures in a room creates a warm, cozy atmosphere. There are lots of ways to bring in different textures. If you have hardwood or tile floors, use a shag rug on the floor. Use a different material on your throw pillows than what you have on your couches. If you have a quilted bedspread, use silk throw pillows and a chenille blanket on the end of the bed. Using exposed brick or adding window treatments to a room are other ways to add textures. 
Source

Update outdated
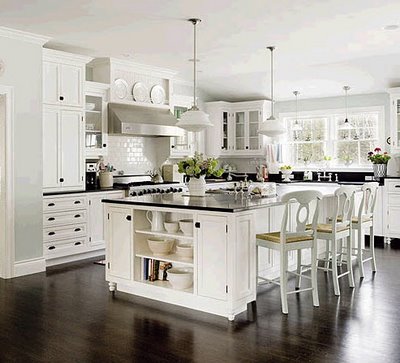
Updating outdated appliances, hardware, or even colors is a great way to make a room look new. It's a little more expensive, but it makes a big impact and is definitely worth the money if you are trying to sell. You will make the money back, I promise! If you have old oak cabinets and want a change, paint them white, add some new knobs and pulls to the doors and drawers and you have a brand-new look. Replace white appliances with stainless steel and old laminate counters with granite to create a gourmet-looking kitchen. 
Source
Traffic flow 
An important aspect of staging any room is to make sure the traffic flow makes sense. This means that people are easily able to maneuver around furniture without having to take indirect paths. Make sure there are uncluttered pathways from room to room, you are able to get to the sofa without tripping over the coffee table, etc. In the kitchen, there needs to be what is called a work triangle between the oven, refrigerator and sink without anything in the way. 
Source

Make it bigger
There are a lot of ways to make rooms look bigger. A couple of ideas are to use mirrors on the walls, paint with light colors, and hang long window treatments. Using mirrors helps the room look larger because it reflects surfaces and creates the illusion of depth. Light colors help open up a room as well, especially if you paint the wall a light color and use the same light color as accents in the room. Long window treatments can make a room look taller, if hung right. You want to hang the curtains close to the ceiling instead of at the top of the window. This fools the eye into thinking your windows are bigger, and thus creates a taller-looking room.
Source

Those are just a few tips that I have learned along the way. If you have any questions, I would love to answer them for you!  

I'm linking this post to these parties:

Free Hot SamplesIts Hump Day!

Photobucket
Pin It!

9.22.2010

Old Trunk

So, a few weekends ago, I found this trunk at a flea market for a steal of $20! I swear we saw about 30 other trunks for over $100 each, so I snagged. it.

I am in the process of making over the inside with "old" newspaper. I thought that would be kind of cool. I would have kept it the same, but it was all stained and gross inside.  There are initials "G" and "K" on the front. Almost perfect! If it was a "C" instead, that'd be wonderful. Oh well.. it's still neat. I wonder who G.K. was?

Take a look!


Now I'm having trouble deciding on where to put it and what to use it for. Any ideas? It's too short to be a coffee table, too tall to be an end table if it's on end. I'm not sure!


Pin It!

9.18.2010

Feeling Crafty

Today was a beautiful day! I got so much accomplished. Don't you love days where you have nothing to do and can just stay home and get stuff done around the house? That doesn't seem to happen very often for me, so when it does, it's such a blessing!

Today I worked on my dining room chairs (they have been a pain!). I'm hoping I will get a post up on them before Christmas rolls around soon.

Anyways, I did a few small crafts today and wanted to show you. The first one I have seen quite a few times on different blogs.

I had an old bottle that was very plain that I used on an end table in my living room. I decided it needed some dressing up and gave it a little face lift. What do you think?


This was seriously so easy to do. I hot glued the beginning (at the top) and just wrapped it around the bottle. I tacked it on with some more hot glue every once in a while and then hot glued the end. Easy!

The other project I worked on was super simple too! I was sick of the coasters I have. They are lime green Hawaiian-like flowers that I had in college and they really don't go with our decor. So, I decided to make my own!

I got some unfinished wood squares at Hobby Lobby, painted the edges red (same paint I used on my accent wall in the living room), cut some scrap book paper, and Mod Podged it on! Here they are.


Yay! They look so much better than what I had before. They were very inexpensive too.
Here's the breakdown:
Wood squares: 2/$1 and I bought 4= $2
Paint: had on hand= $0
Scrapbook paper: 3/$1 and I didn't use a whole sheet= $.50
Mod Podge: had on hand= $0
Total cost: $2.50

Hope you enjoy! Have you done any small projects lately?
Pin It!

9.13.2010

Decorating for Fall

I know I'm about a week behind the rest of blogland in decorating for fall. Technically, it's not fall yet though so I think I'm doing pretty good! And, it's my first house to decorate for fall, so I didn't really have any decorations yet. Last fall I only had an apartment and didn't really do much with it.

I've only done my living room so far, but I think it is a fabulous start!

Please excuse the dust and the tags still on the berry twigs... I wasn't sure I was keeping them! 


What do your fall decorations look like?
Pin It!

9.07.2010

Coffee Table Centerpiece

Hey all! So yesterday I promised more pictures of my coffee table centerpiece that I put together. The inspiration came from Show and Tell. I really love the way she decorated for her grandma's wedding. Go check it out!

Anyways, she made these cool mason jar trays and I wanted one for my coffee table. Check out what I came up with!

There aren't any before and after shots because, well, there was no before. We just found some pieces of old barn wood, cut them to the right size, screwed them together and voila! A coffee table centerpiece.
Oh, and I put felt underneath so it wouldn't scratch our coffee table.

Here it is in the room again:


I'm still waiting to get some fresh flowers to put in there! And maybe in the future, I'll brush a little paint on. Or stencil some sweet lettering on. Who knows?

What do you think?
Pin It!